由于骑手不能随时处在有 WIFI 的状态,流量变成了很敏感的问题,为了精确到每个 API 的流量,进行针对性的优化,开始在我们的 APM 中添加流量监控功能。
本文将记录自己做流量监控方面的总结。其中包括了非常多的踩坑经验,和现有一些方案的缺陷分析,对我来说是一个非常有意义的过程。
干货预警🤣请做好读大量代码的准备😂😂😂
一、资料收集
就目前来说,各家大厂基本都有自己的 APM(包括我们公司其实之前也有一套 APM,但是由于各个事业部的需求不同,尚不能完全满足物流平台的需要)但各家大厂目前开源的 APM 项目却不多,当然也可能是由于各家的业务场景差异比较大且对数据的后续处理不同。
所以本次在查阅资料阶段,没有太多的源码可选参考,但有不少文章。
以下是一些本次开发过程中参考的文章和开源库:
- iOS-Monitor-Platform
- GodEye
- NetworkEye
- 移动端性能监控方案Hertz
- 使用NSURLProtocol注意的一些问题
- iOS 开发中使用 NSURLProtocol 拦截 HTTP 请求
- 获取NSURLResponse的HTTPVersion
但以上这些资料对我们的需求都有不足之处:
1. Request 和 Response 记在同一条记录
在实际的网络请求中 Request 和 Response 不一定是成对的,如果网络断开、或者突然关闭进程,都会导致不成对现象,如果将 Request 和 Response 记录在同一条数据,将会对统计造成偏差
2. 上行流量记录不精准
主要的原因有三大类:
- 直接忽略了 Header 和 Line 部分
- 忽略了 Cookie 部分,实际上,臃肿的 Cookie 也是消耗流量的一部分
- body 部分的字节大小计算直接使用了
HTTPBody.length 不够准确
3. 下行流量记录不精准
主要原因有:
- 直接忽略了 Header 和 Status-Line 部分
- body 部分的字节大小计算直接使用了
expectedContentLength 不够准确
- 忽略了 gzip 压缩,在实际网络编程中,往往都使用了 gzip 来进行数据压缩,而系统提供的一些监听方法,返回的 NSData 实际是解压过的,如果直接统计字节数会造成大量偏差
后文将详细讲述。
二、需求
先简单罗列我们的需求:
- Request 基本信息记录
- 上行流量
- Reponse 基本信息记录
- 下行流量
- 数据归类:按照 host 和 path 归类,一条记录记载改 host/path 的 Request 记录数,Response 记录数,Reqeust 总流量(上行流量),Reponse 总流量(下行流量)
我们的侧重点是流量统计,为了方便分析 APP 使用中哪些 API 消耗流量多。所以对上行、下行流量都需要尽量准确记录。
最终的数据库表展示:
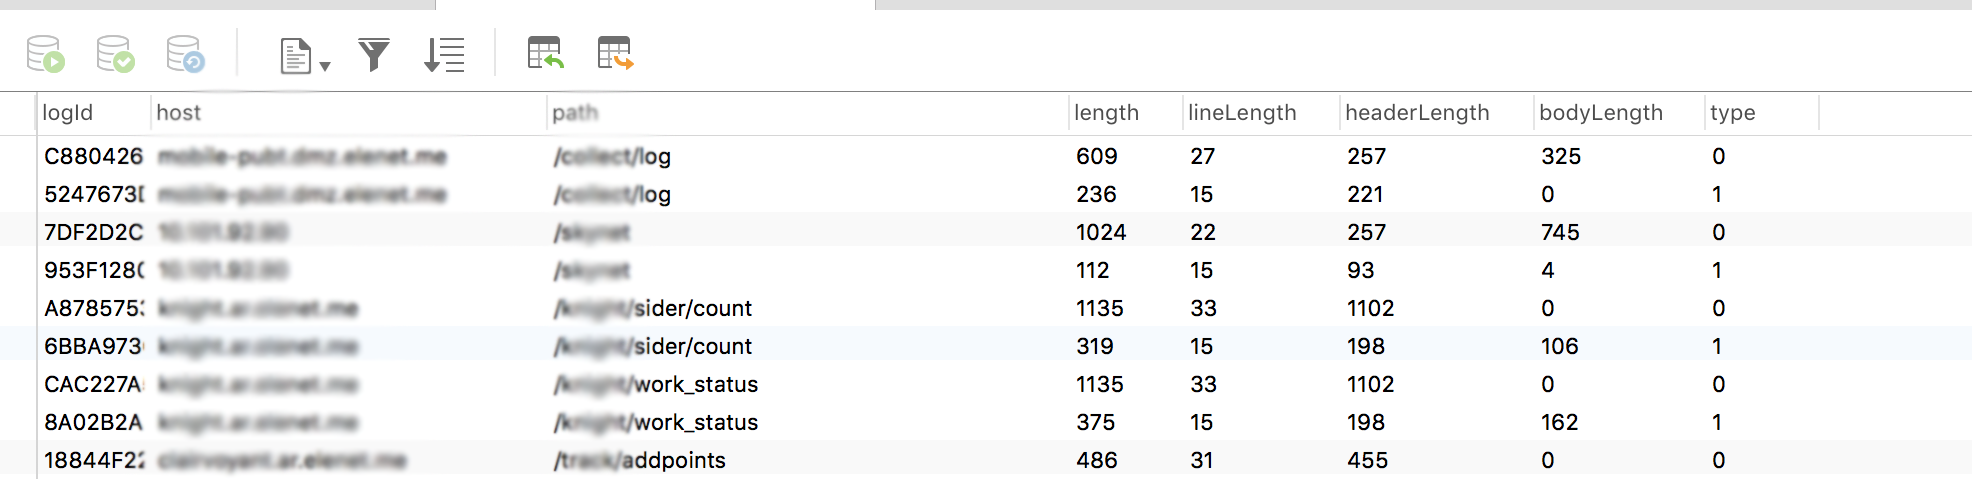
type 字段表示的是『该条记录是 Request 还是 Response』,几个 length 分别记录了流量的各个细节,包括:总字节数、Line 字节数、Header 字节数、Body 字节数。
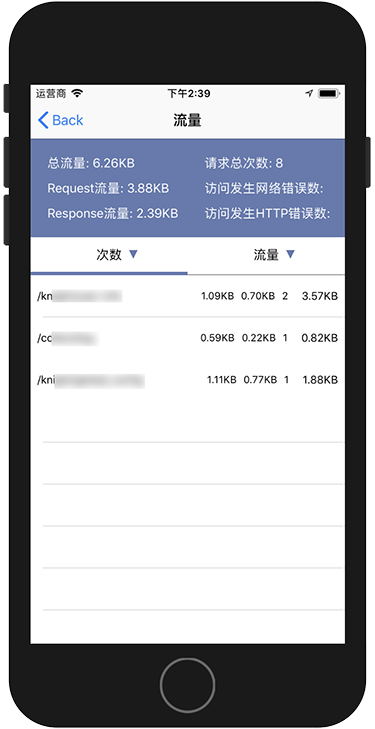
最后的界面展示类似于:
三、分析现有资料
现在分析一下上面收集到的资料有哪些不足之处。
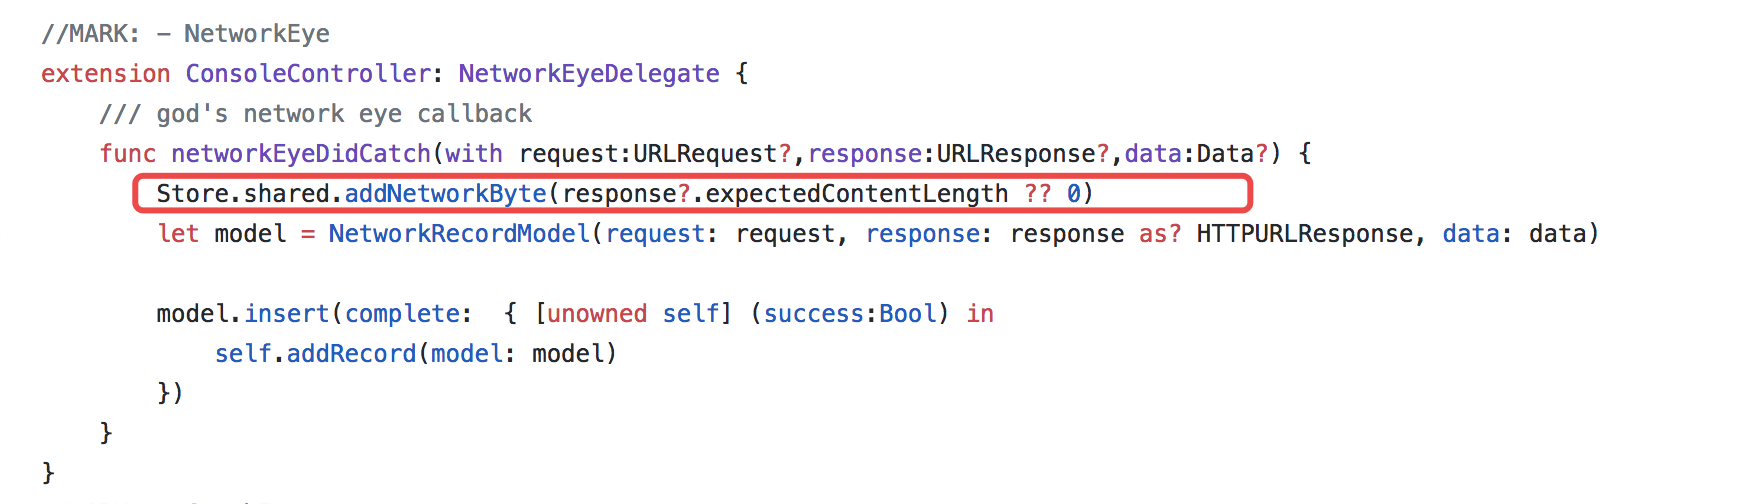
GodEye | NetworkEye:
NetworkEye 是 GodEye 的一部分,可以单独拆出来使用的网络监控库。
查阅两者的源码后发现,NetworkEye
- 仅仅记录了 Reponse 的流量
- 通过 expectedContentLength 记录是不准确的(后面将会说到)
- 仅仅记录了总和,这对我们来说是无意义的,不能分析出哪条 API 流量使用多
移动端性能监控方案Hertz:
美团的文章中展示几个代码片段:
1
2
3
4
5
6
7
8
9
10
11
12
13
14
| - (void)connectionDidFinishLoading:(NSURLConnection *)connection
{
[self.client URLProtocolDidFinishLoading:self];
self.data = nil;
if (connection.originalRequest) {
WMNetworkUsageDataInfo *info = [[WMNetworkUsageDataInfo alloc] init];
self.connectionEndTime = [[NSDate date] timeIntervalSince1970];
info.responseSize = self.responseDataLength;
info.requestSize = connection.originalRequest.HTTPBody.length;
info.contentType = [WMNetworkUsageURLProtocol getContentTypeByURL:connection.originalRequest.URL andMIMEType:self.MIMEType];
[[WMNetworkMeter sharedInstance] setLastDataInfo:info];
[[WMNetworkUsageManager sharedManager] recordNetworkUsageDataInfo:info];
}
|
在 connectionDidFinishLoading 中记录了整个网络请求结束的时间、 response 数据大小、request 数据大小以及一些其他数据。
总体来说是比较详细的,但是这里并没有给出 self.responseDataLength 的具体逻辑,另外 connection.originalRequest.HTTPBody.length 仅仅是 Request body 的大小。
iOS-Monitor-Platform:
这篇文章比较详细的介绍了整个 APM 制作的过程,贴出了很多代码段,应该说非常详细也极具参考价值。
在流量部分,也分别针对了上行流量、下行流量进行了区分,但其中:
- 没有处理 gzip 压缩情况
- 对 Header 计算大小的方式是 Dictionary 转 NSData,然而实际上头部并不是 Json 格式(这块我觉得很迷,因为作者特意展示了 HTTP 报文组成)
四、动手自己做
HTTP 报文
为了更好的让大家了解 HTTP 流量计算的一些关键信息,首先要了解 HTTP 报文的组成。
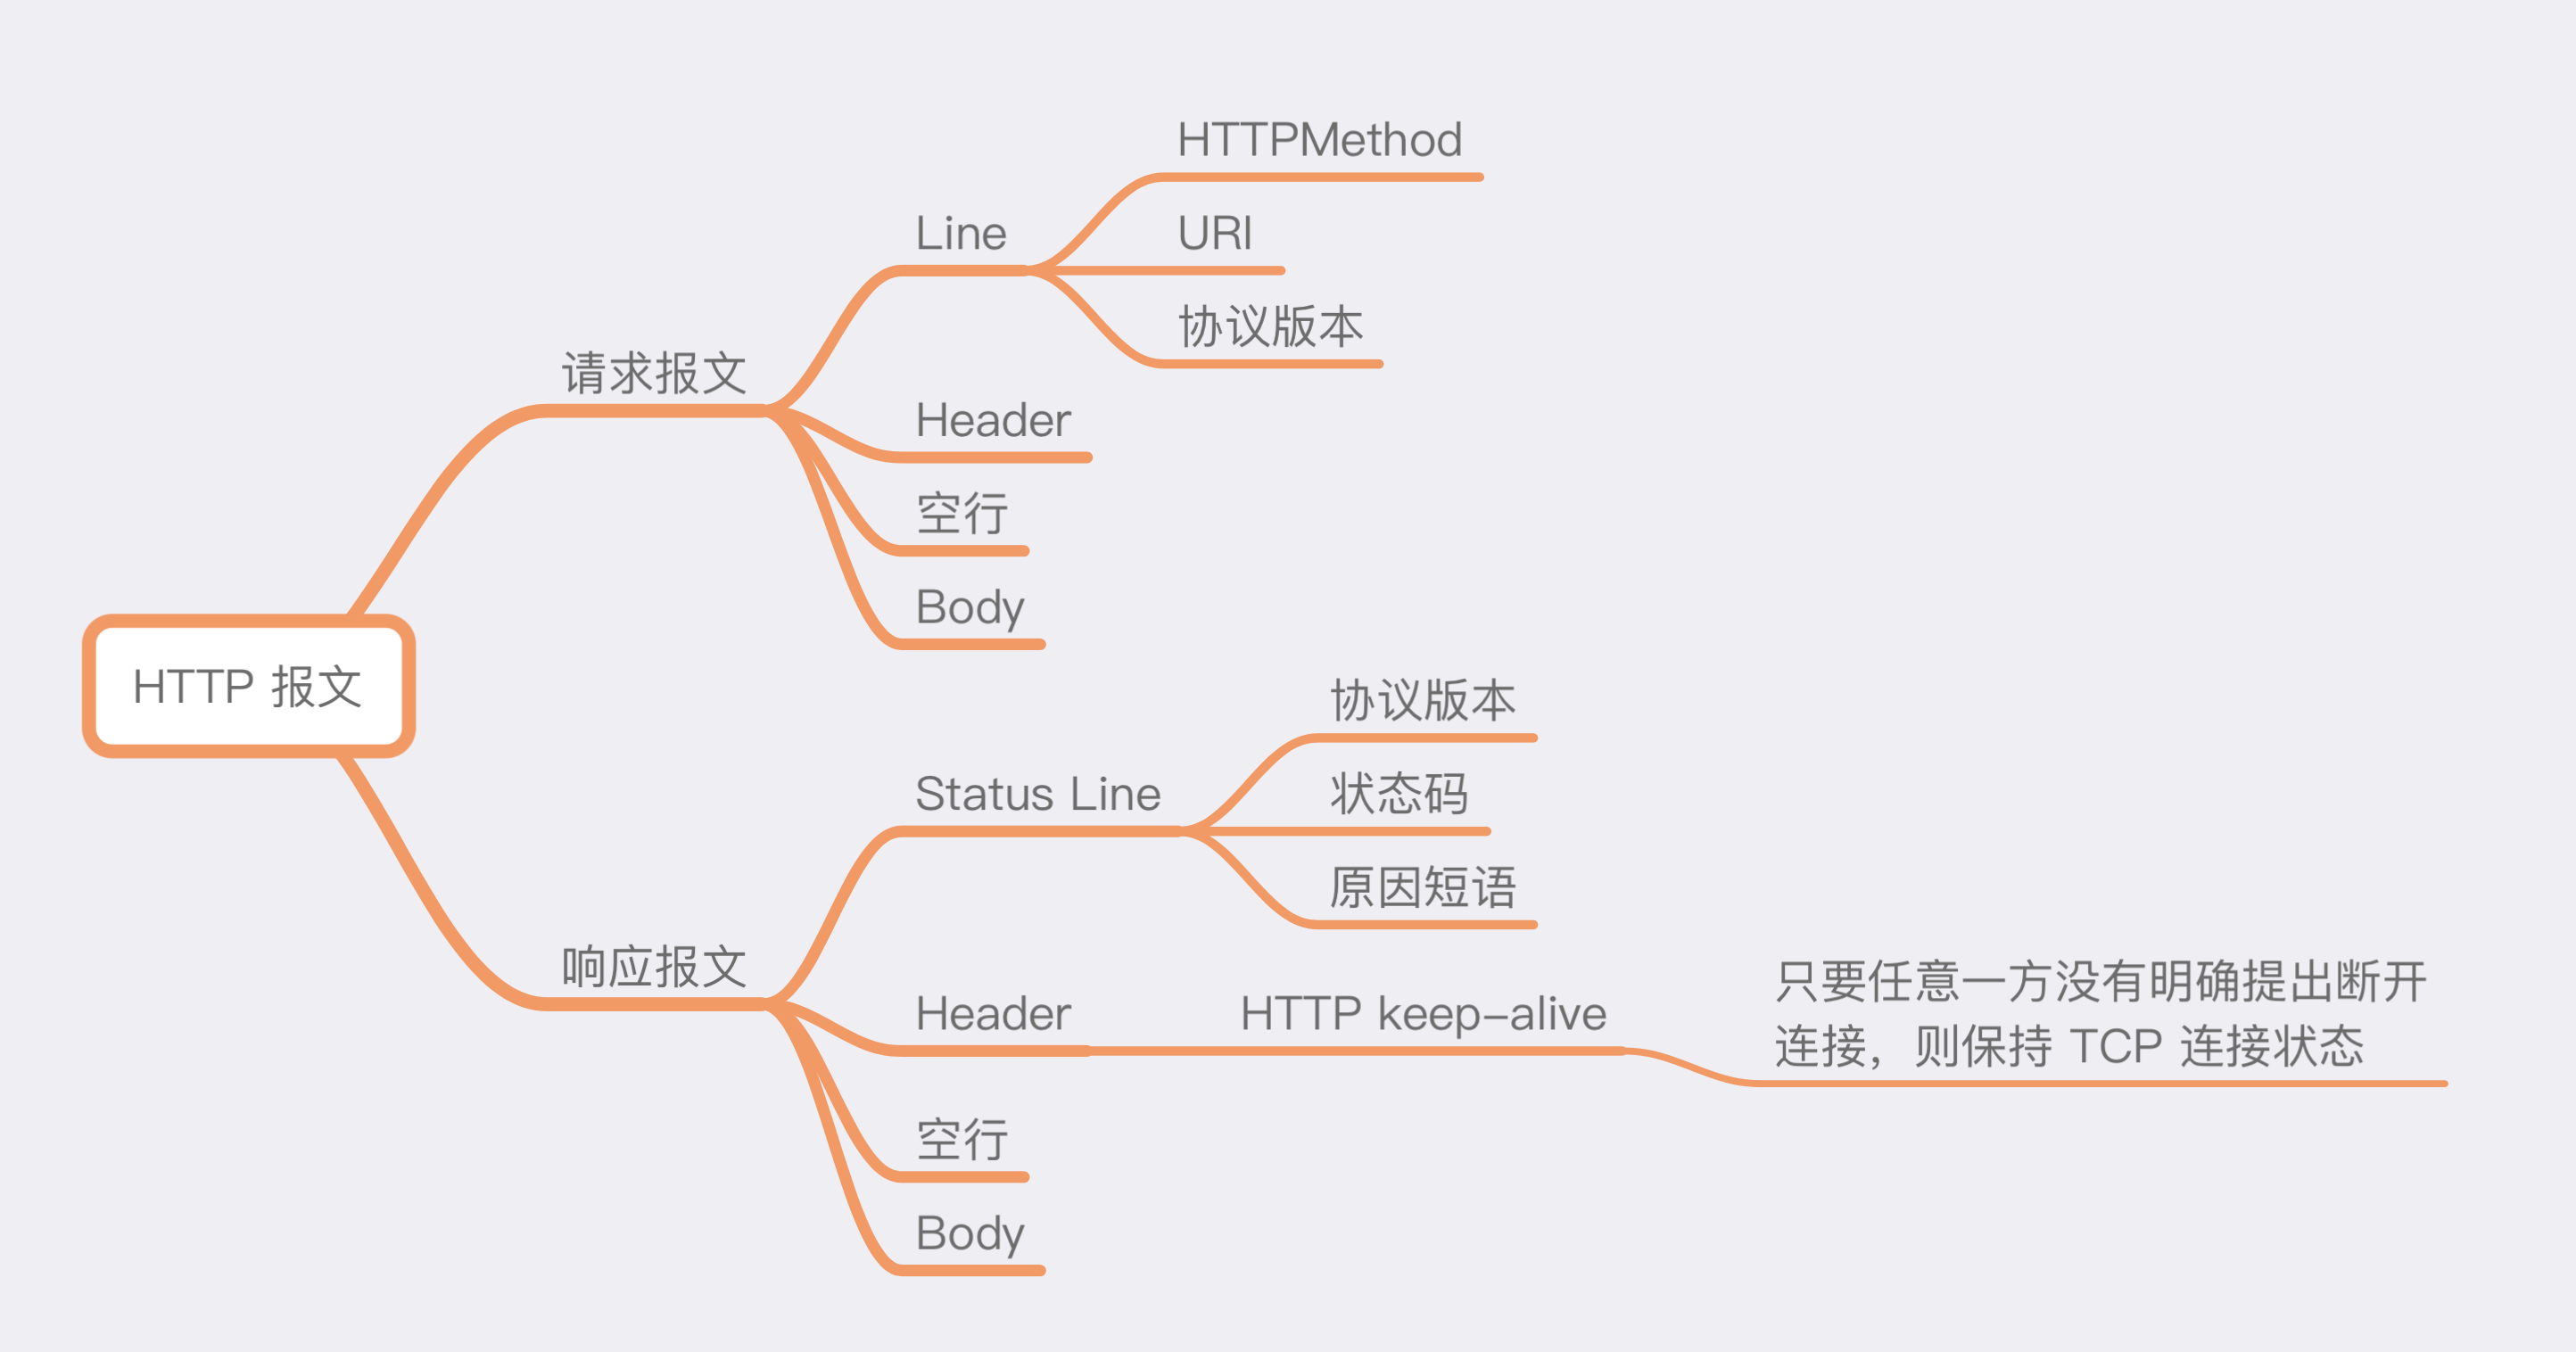
再来随便抓个包具体看看:


iOS 下的网络监控
这块我采用的大家耳熟能详的 NSURLProtocol,NSURLProtocol 方式除了通过 CFNetwork 发出的网络请求,全部都可以拦截到。
Apple 文档中对 NSURLProtocol 有非常详细的描述和使用介绍
An abstract class that handles the loading of protocol-specific URL data.
如果想更详细的了解 NSURLProtocol,也可以看大佐的这篇文章
在每一个 HTTP 请求开始时,URL 加载系统创建一个合适的 NSURLProtocol 对象处理对应的 URL 请求,而我们需要做的就是写一个继承自 NSURLProtocol 的类,并通过 - registerClass: 方法注册我们的协议类,然后 URL 加载系统就会在请求发出时使用我们创建的协议对象对该请求进行处理。
NSURLProtocol 是一个抽象类,需要做的第一步就是集成它,完成我们的自定义设置。
创建自己的 DMURLProtocol,为它添加几个属性并实现相关接口:
1
2
3
4
5
6
7
8
| @interface DMURLProtocol() <NSURLConnectionDelegate, NSURLConnectionDataDelegate>
@property (nonatomic, strong) NSURLConnection *connection;
@property (nonatomic, strong) NSURLRequest *dm_request;
@property (nonatomic, strong) NSURLResponse *dm_response;
@property (nonatomic, strong) NSMutableData *dm_data;
@end
|
canInitWithRequest & canonicalRequestForRequest:
1
| static NSString *const DMHTTP = @"LPDHTTP";
|
1
2
3
4
5
6
7
8
9
10
| + (BOOL)canInitWithRequest:(NSURLRequest *)request {
if (![request.URL.scheme isEqualToString:@"http"]) {
return NO;
}
if ([NSURLProtocol propertyForKey:LPDHTTP inRequest:request] ) {
return NO;
}
return YES;
}
|
1
2
3
4
5
6
7
| + (NSURLRequest *)canonicalRequestForRequest:(NSURLRequest *)request {
NSMutableURLRequest *mutableReqeust = [request mutableCopy];
[NSURLProtocol setProperty:@YES
forKey:DMHTTP
inRequest:mutableReqeust];
return [mutableReqeust copy];
}
|
startLoading:
1
2
3
4
5
| - (void)startLoading {
NSURLRequest *request = [[self class] canonicalRequestForRequest:self.request];
self.connection = [[NSURLConnection alloc] initWithRequest:request delegate:self startImmediately:YES];
self.dm_request = self.request;
}
|
didReceiveResponse:
1
2
3
4
| - (void)connection:(NSURLConnection *)connection didReceiveResponse:(NSURLResponse *)response {
[[self client] URLProtocol:self didReceiveResponse:response cacheStoragePolicy:NSURLCacheStorageAllowed];
self.dm_response = response;
}
|
didReceiveData:
1
2
3
4
| - (void)connection:(NSURLConnection *)connection didReceiveData:(NSData *)data {
[self.client URLProtocol:self didLoadData:data];
[self.dm_data appendData:data];
}
|
以上部分是为了在单次 HTTP 请求中记录各个所需要属性。
记录 Response 信息
前面的代码实现了在网络请求过程中为 dm_response 和 dm_data 赋值,那么在 stopLoading 方法中,就可以分析 dm_response 和 dm_data 对象,获取下行流量等相关信息。
需要说明的是,如果需要获得非常精准的流量,一般来说只有通过 Socket 层获取是最准确的,因为可以获取包括握手、挥手的数据大小。当然,我们的目的是为了分析 App 的耗流量 API,所以仅从应用层去分析也基本满足了我们的需要。
上文中说到了报文的组成,那么按照报文所需要的内容获取。
Status Line
非常遗憾的是 NSURLResponse 没有接口能直接获取报文中的 Status Line,甚至连 HTTP Version 等组成 Status Line 内容的接口也没有。
最后,我通过转换到 CFNetwork 相关类,才拿到了 Status Line 的数据,这其中可能涉及到了读取私有 API
这里我为 NSURLResponse 添加了一个扩展:NSURLResponse+DoggerMonitor,并为其添加 statusLineFromCF 方法
1
2
3
4
5
6
7
8
9
10
11
12
13
14
15
16
17
18
19
20
21
22
23
24
| typedef CFHTTPMessageRef (*DMURLResponseGetHTTPResponse)(CFURLRef response);
- (NSString *)statusLineFromCF {
NSURLResponse *response = self;
NSString *statusLine = @"";
NSString *funName = @"CFURLResponseGetHTTPResponse";
DMURLResponseGetHTTPResponse originURLResponseGetHTTPResponse =
dlsym(RTLD_DEFAULT, [funName UTF8String]);
SEL theSelector = NSSelectorFromString(@"_CFURLResponse");
if ([response respondsToSelector:theSelector] &&
NULL != originURLResponseGetHTTPResponse) {
CFTypeRef cfResponse = CFBridgingRetain([response performSelector:theSelector]);
if (NULL != cfResponse) {
CFHTTPMessageRef messageRef = originURLResponseGetHTTPResponse(cfResponse);
statusLine = (__bridge_transfer NSString *)CFHTTPMessageCopyResponseStatusLine(messageRef);
CFRelease(cfResponse);
}
}
return statusLine;
}
|
通过调用私有 API _CFURLResponse 获得 CFTypeRef 再转换成 CFHTTPMessageRef,获取 Status Line。
再将其转换成 NSData 计算字节大小:
1
2
3
4
5
6
7
8
9
| - (NSUInteger)dm_getLineLength {
NSString *lineStr = @"";
if ([self isKindOfClass:[NSHTTPURLResponse class]]) {
NSHTTPURLResponse *httpResponse = (NSHTTPURLResponse *)self;
lineStr = [self statusLineFromCF];
}
NSData *lineData = [lineStr dataUsingEncoding:NSUTF8StringEncoding];
return lineData.length;
}
|
通过 httpResponse.allHeaderFields 拿到 Header 字典,再拼接成报文的 key: value 格式,转换成 NSData 计算大小:
1
2
3
4
5
6
7
8
9
10
11
12
13
14
15
16
17
18
19
| - (NSUInteger)dm_getHeadersLength {
NSUInteger headersLength = 0;
if ([self isKindOfClass:[NSHTTPURLResponse class]]) {
NSHTTPURLResponse *httpResponse = (NSHTTPURLResponse *)self;
NSDictionary<NSString *, NSString *> *headerFields = httpResponse.allHeaderFields;
NSString *headerStr = @"";
for (NSString *key in headerFields.allKeys) {
headerStr = [headerStr stringByAppendingString:key];
headerStr = [headerStr stringByAppendingString:@": "];
if ([headerFields objectForKey:key]) {
headerStr = [headerStr stringByAppendingString:headerFields[key]];
}
headerStr = [headerStr stringByAppendingString:@"\n"];
}
NSData *headerData = [headerStr dataUsingEncoding:NSUTF8StringEncoding];
headersLength = headerData.length;
}
return headersLength;
}
|
Body
对于 Body 的计算,上文看到有些文章里采用的 expectedContentLength 或者去 NSURLResponse 对象的 allHeaderFields 中获取 Content-Length 值,其实都不够准确。
首先 API 文档中对 expectedContentLength 也有介绍是不准确的:
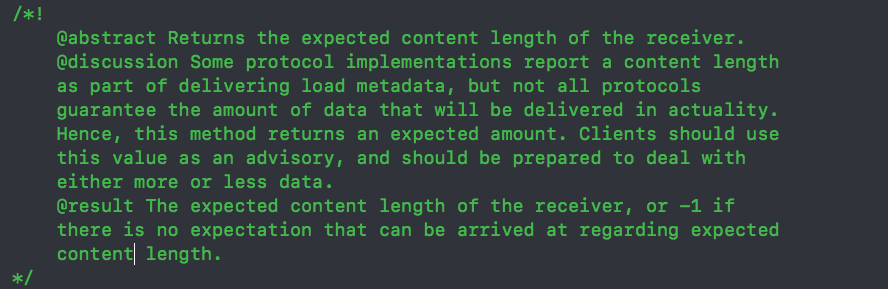
其次,HTTP 1.1 标准里也有介绍 Content-Length 字段不一定是每个 Response 都带有的,最重要的是,Content-Length 只是表示 Body 部分的大小。
我的方式是,在前面代码中有写到,在 didReceiveData 中对 dm_data 进行了赋值
didReceiveData:
1
2
3
4
| - (void)connection:(NSURLConnection *)connection didReceiveData:(NSData *)data {
[self.client URLProtocol:self didLoadData:data];
[self.dm_data appendData:data];
}
|
那么在 stopLoading 方法中,就可以拿到本次网络请求接收到的数据。
但需要注意对 gzip 情况进行区别分析。我们知道 HTTP 请求中,客户端在发送请求的时候会带上 Accept-Encoding,这个字段的值将会告知服务器客户端能够理解的内容压缩算法。而服务器进行相应时,会在 Response 中添加 Content-Encoding 告知客户端选中的压缩算法。
所以,我们在 stopLoading 中获取 Content-Encoding,如果使用了 gzip,则模拟一次 gzip 压缩,再计算字节大小:
1
2
3
4
5
6
7
8
9
10
11
12
13
14
15
16
17
18
19
20
21
22
| - (void)stopLoading {
[self.connection cancel];
DMNetworkTrafficLog *model = [[DMNetworkTrafficLog alloc] init];
model.path = self.request.URL.path;
model.host = self.request.URL.host;
model.type = DMNetworkTrafficDataTypeResponse;
model.lineLength = [self.dm_response dm_getLineLength];
model.headerLength = [self.dm_response dm_getHeadersLength];
if ([self.dm_response isKindOfClass:[NSHTTPURLResponse class]]) {
NSHTTPURLResponse *httpResponse = (NSHTTPURLResponse *)self.dm_response;
NSData *data = self.dm_data;
if ([[httpResponse.allHeaderFields objectForKey:@"Content-Encoding"] isEqualToString:@"gzip"]) {
data = [self.dm_data gzippedData];
}
model.bodyLength = data.length;
}
model.length = model.lineLength + model.headerLength + model.bodyLength;
[model settingOccurTime];
[[DMDataManager defaultDB] addNetworkTrafficLog:model];
}
|
这里 gzippedData 参考这个库的内容
[[DMDataManager defaultDB] addNetworkTrafficLog:model]; 是调用持久化层的代码将数据落库。
记录 Resquest 信息
Line
很遗憾,对于NSURLRequest 我没有像 NSURLReponse 一样幸运的找到私有接口将其转换成 CFNetwork 相关数据,但是我们很清楚 HTTP 请求报文 Line 部分的组成,所以我们可以添加一个方法,获取一个经验 Line。
同样为 NSURLReques 添加一个扩展:NSURLRequest+DoggerMonitor
1
2
3
4
5
| - (NSUInteger)dgm_getLineLength {
NSString *lineStr = [NSString stringWithFormat:@"%@ %@ %@\n", self.HTTPMethod, self.URL.path, @"HTTP/1.1"];
NSData *lineData = [lineStr dataUsingEncoding:NSUTF8StringEncoding];
return lineData.length;
}
|
Header 这里有一个非常大的坑。
request.allHTTPHeaderFields 拿到的头部数据是有很多缺失的,这块跟业内朋友交流的时候,发现很多人都没有留意到这个问题。
缺失的部分不仅仅是上面一篇文章中说到的 Cookie。
如果通过 Charles 抓包,可以看到,会缺失包括但不仅限于以下字段:
- Accept
- Connection
- Host
这个问题非常的迷,同时由于无法转换到 CFNetwork 层,所以一直拿不到准确的 Header 数据。
最后,我在 so 上也找到了两个相关问题,供大家参考
NSUrlRequest: where an app can find the default headers for HTTP request?
NSMutableURLRequest, cant access all request headers sent out from within my iPhone program
两个问题的回答基本表明了,如果你是通过 CFNetwork 来发起请求的,才可以拿到完整的 Header 数据。
所以这块只能拿到大部分的 Header,但是基本上缺失的都固定是那几个字段,对我们流量统计的精确度影响不是很大。
那么主要就针对 cookie 部分进行补全:
1
2
3
4
5
6
7
8
9
10
11
12
13
14
15
16
17
18
19
20
21
22
23
24
25
26
27
| - (NSUInteger)dgm_getHeadersLengthWithCookie {
NSUInteger headersLength = 0;
NSDictionary<NSString *, NSString *> *headerFields = self.allHTTPHeaderFields;
NSDictionary<NSString *, NSString *> *cookiesHeader = [self dgm_getCookies];
if (cookiesHeader.count) {
NSMutableDictionary *headerFieldsWithCookies = [NSMutableDictionary dictionaryWithDictionary:headerFields];
[headerFieldsWithCookies addEntriesFromDictionary:cookiesHeader];
headerFields = [headerFieldsWithCookies copy];
}
NSLog(@"%@", headerFields);
NSString *headerStr = @"";
for (NSString *key in headerFields.allKeys) {
headerStr = [headerStr stringByAppendingString:key];
headerStr = [headerStr stringByAppendingString:@": "];
if ([headerFields objectForKey:key]) {
headerStr = [headerStr stringByAppendingString:headerFields[key]];
}
headerStr = [headerStr stringByAppendingString:@"\n"];
}
NSData *headerData = [headerStr dataUsingEncoding:NSUTF8StringEncoding];
headersLength = headerData.length;
return headersLength;
}
|
1
2
3
4
5
6
7
8
9
| - (NSDictionary<NSString *, NSString *> *)dgm_getCookies {
NSDictionary<NSString *, NSString *> *cookiesHeader;
NSHTTPCookieStorage *cookieStorage = [NSHTTPCookieStorage sharedHTTPCookieStorage];
NSArray<NSHTTPCookie *> *cookies = [cookieStorage cookiesForURL:self.URL];
if (cookies.count) {
cookiesHeader = [NSHTTPCookie requestHeaderFieldsWithCookies:cookies];
}
return cookiesHeader;
}
|
body
最后是 body 部分,这里也有个坑。通过 NSURLConnection 发出的网络请求 resquest.HTTPBody 拿到的是 nil。
需要转而通过 HTTPBodyStream 读取 stream 来获取 request 的 Body 大小。
1
2
3
4
5
6
7
8
9
10
11
12
13
14
15
16
17
18
19
20
21
22
23
24
25
26
27
| - (NSUInteger)dgm_getBodyLength {
NSDictionary<NSString *, NSString *> *headerFields = self.allHTTPHeaderFields;
NSUInteger bodyLength = [self.HTTPBody length];
if ([headerFields objectForKey:@"Content-Encoding"]) {
NSData *bodyData;
if (self.HTTPBody == nil) {
uint8_t d[1024] = {0};
NSInputStream *stream = self.HTTPBodyStream;
NSMutableData *data = [[NSMutableData alloc] init];
[stream open];
while ([stream hasBytesAvailable]) {
NSInteger len = [stream read:d maxLength:1024];
if (len > 0 && stream.streamError == nil) {
[data appendBytes:(void *)d length:len];
}
}
bodyData = [data copy];
[stream close];
} else {
bodyData = self.HTTPBody;
}
bodyLength = [[bodyData gzippedData] length];
}
return bodyLength;
}
|
落库
最后在 DMURLProtocol 的 - (nullable NSURLRequest *)connection:(NSURLConnection *)connection willSendRequest:(NSURLRequest *)request redirectResponse:(nullable NSURLResponse *)response; 方法中对 resquest 调用报文各个部分大小方法后落库:
1
2
3
4
5
6
7
8
9
10
11
12
13
14
15
16
17
18
| -(NSURLRequest *)connection:(NSURLConnection *)connection willSendRequest:(NSURLRequest *)request redirectResponse:(NSURLResponse *)response {
if (response != nil) {
self.dm_response = response;
[self.client URLProtocol:self wasRedirectedToRequest:request redirectResponse:response];
}
DMNetworkTrafficLog *model = [[DMNetworkTrafficLog alloc] init];
model.path = request.URL.path;
model.host = request.URL.host;
model.type = DMNetworkTrafficDataTypeRequest;
model.lineLength = [connection.currentRequest dgm_getLineLength];
model.headerLength = [connection.currentRequest dgm_getHeadersLengthWithCookie];
model.bodyLength = [connection.currentRequest dgm_getBodyLength];
model.length = model.lineLength + model.headerLength + model.bodyLength;
[model settingOccurTime];
[[DMDataManager defaultDB] addNetworkTrafficLog:model];
return request;
}
|
针对 NSURLSession 的处理
直接使用 DMURLProtocol 并 registerClass 并不能完整的拦截所有网络请求,因为通过 NSURLSession 的 sharedSession 发出的请求是无法被 NSURLProtocol 代理的。
我们需要让 [NSURLSessionConfiguration defaultSessionConfiguration].protocolClasses 的属性中也设置我们的 DMURLProtocol,这里通过 swizzle,置换 protocalClasses 的 get 方法:
编写一个 DMURLSessionConfiguration
1
2
3
4
5
6
7
8
9
10
| #import <Foundation/Foundation.h>
@interface DMURLSessionConfiguration : NSObject
@property (nonatomic,assign) BOOL isSwizzle;
+ (DMURLSessionConfiguration *)defaultConfiguration;
- (void)load;
- (void)unload;
@end
|
1
2
3
4
5
6
7
8
9
10
11
12
13
14
15
16
17
18
19
20
21
22
23
24
25
26
27
28
29
30
31
32
33
34
35
36
37
38
39
40
41
42
43
44
45
46
47
48
49
50
51
52
53
| #import "DMURLSessionConfiguration.h"
#import <objc/runtime.h>
#import "DMURLProtocol.h"
#import "DMNetworkTrafficManager.h"
@implementation DMURLSessionConfiguration
+ (DMURLSessionConfiguration *)defaultConfiguration {
static DMURLSessionConfiguration *staticConfiguration;
static dispatch_once_t onceToken;
dispatch_once(&onceToken, ^{
staticConfiguration=[[DMURLSessionConfiguration alloc] init];
});
return staticConfiguration;
}
- (instancetype)init {
self = [super init];
if (self) {
self.isSwizzle = NO;
}
return self;
}
- (void)load {
self.isSwizzle = YES;
Class cls = NSClassFromString(@"__NSCFURLSessionConfiguration") ?: NSClassFromString(@"NSURLSessionConfiguration");
[self swizzleSelector:@selector(protocolClasses) fromClass:cls toClass:[self class]];
}
- (void)unload {
self.isSwizzle=NO;
Class cls = NSClassFromString(@"__NSCFURLSessionConfiguration") ?: NSClassFromString(@"NSURLSessionConfiguration");
[self swizzleSelector:@selector(protocolClasses) fromClass:cls toClass:[self class]];
}
- (void)swizzleSelector:(SEL)selector fromClass:(Class)original toClass:(Class)stub {
Method originalMethod = class_getInstanceMethod(original, selector);
Method stubMethod = class_getInstanceMethod(stub, selector);
if (!originalMethod || !stubMethod) {
[NSException raise:NSInternalInconsistencyException format:@"Couldn't load NEURLSessionConfiguration."];
}
method_exchangeImplementations(originalMethod, stubMethod);
}
- (NSArray *)protocolClasses {
return [DMNetworkTrafficManager manager].protocolClasses;
}
@end
|
这样,我们写好了方法置换,在执行过该类单例的 load 方法后,[NSURLSessionConfiguration defaultSessionConfiguration].protocolClasses 拿到的将会是我们设置好的 protocolClasses。
如此,我们再为 DMURLProtocol 添加 start 和 stop 方法,用于启动网络监控和停止网络监控:
1
2
3
4
5
6
7
8
9
10
11
12
13
14
15
16
17
18
19
| + (void)start {
DMURLSessionConfiguration *sessionConfiguration = [DMURLSessionConfiguration defaultConfiguration];
for (id protocolClass in [DMNetworkTrafficManager manager].protocolClasses) {
[NSURLProtocol registerClass:protocolClass];
}
if (![sessionConfiguration isSwizzle]) {
[sessionConfiguration load];
}
}
+ (void)end {
DMURLSessionConfiguration *sessionConfiguration = [DMURLSessionConfiguration defaultConfiguration];
[NSURLProtocol unregisterClass:[DMURLProtocol class]];
if ([sessionConfiguration isSwizzle]) {
[sessionConfiguration unload];
}
}
|
到此,基本完成了整个网络流量监控。
再提供一个 Manger 方便使用者调用:
1
2
3
4
5
6
7
8
9
10
11
12
13
14
15
16
17
18
19
20
| #import <Foundation/Foundation.h>
@class DMNetworkLog;
@interface DMNetworkTrafficManager : NSObject
@property (nonatomic, strong) NSArray *protocolClasses;
+ (DMNetworkTrafficManager *)manager;
+ (void)startWithProtocolClasses:(NSArray *)protocolClasses;
+ (void)start;
+ (void)end;
@end
|
1
2
3
4
5
6
7
8
9
10
11
12
13
14
15
16
17
18
19
20
21
22
23
24
25
26
27
28
29
30
31
32
33
34
35
| #import "DMNetworkTrafficManager.h"
#import "DMURLProtocol.h"
@interface DMNetworkTrafficManager ()
@end
@implementation DMNetworkTrafficManager
#pragma mark - Public
+ (DMNetworkTrafficManager *)manager {
static DMNetworkTrafficManager *manager;
static dispatch_once_t onceToken;
dispatch_once(&onceToken, ^{
manager=[[DMNetworkTrafficManager alloc] init];
});
return manager;
}
+ (void)startWithProtocolClasses:(NSArray *)protocolClasses {
[self manager].protocolClasses = protocolClasses;
[DMURLProtocol start];
}
+ (void)start {
[self manager].protocolClasses = @[[DMURLProtocol class]];
[DMURLProtocol start];
}
+ (void)end {
[DMURLProtocol end];
}
@end
|
五、代码
本文中贴出了比较多的代码,为了便于大家整体观看,可以到 这里 来阅读。
由于其中包含了一些数据操作的内容不需要关心,所以我直接省略了,虽然没有 Demo,但我相信大家都是能理解整个监控结构的。
六、Other
如果你的 APP 从 iOS 9 支持,可以使用 NetworkExtension,通过 NetworkExtension 可以通过 VPN 的形式接管整个网络请求,省掉了上面所有的烦恼。
有什么问题都可以在博文后面留言,或者微博上私信我。
博主是 iOS 妹子一枚。
希望大家一起进步。
我的微博:Lotty周小鱼